通过Forwarded Ports(转发端口)
一、案例
当我们在一台Centos7.3的系统上安装Vagrant+Virtualbox,我们通过Vagrant启动了一个ubuntu的虚拟机,并且我想做如下事情
1)从局域网的任何一台机器上都可以登陆ubuntu虚拟机
2)从局域网任何一台机器上通过访问ubuntu虚拟机上提供的web服务等
解决办法:我们可以在Centos7.3服务器上配置Forwarded Ports转发端口,意思就是把
Centos7.3 端口 ubuntu16.04 端口
10.2.11.203 2100 10.0.2.15 22
10.2.11.203 80 10.0.2.15 80
当局域网的电脑需要远程登录到ubuntu16.04(10.0.2.15)的22端口时,我们只需要远程连接Centos7.3(10.2.11.203)的2100端口即可。(因为做了端口映射)
那么其他的服务也类似。
注意: 由于vagrant启动的时候,默认只能通过Centos7.3本机通过vagrant ssh登录到虚拟机ubuntu(由于默认把127.0.0.1:2222映射到ubuntu16.04虚拟机的22端口),如果我们想从局域网其他机器上ssh到ubuntu虚拟机,就必须重新做端口映射,而且这个端口不能为2222,否则会报错
二、配置参数
1)选项
guest (int) 虚拟机上的端口———————-必须(例如guest: 22)
guest(string) 虚拟机上的IP地址———————-如果没有设置,则监听虚拟机上所有IP地址(可选)
host (int) 物理机上的端口—————————必须(例如:host: 2100)
host_ip(string)物理机上的IP地址——————如果物理机有多个IP地址,我们需要绑定到那个IP,在这里指定(可选)
protocol(string) 协议如tcp,upd————-可选
2)
auto_correct: true (意思:当一个物理机上运行多个虚拟机的时候,难免映射端口的时候,出现碰撞,导致虚拟机起不来。我们这种这个参数,如果发生碰撞,端口会随机调整)
案例:
Vagrant.configure("2") do |config|config.vm.network "forwarded_port", guest: 2003, host: 12003, protocol: "tcp"config.vm.network "forwarded_port", guest: 2003, host: 12003, protocol: "udp"end
(把物理机上tcp 12003映射到虚拟机的tcp 2003端口,把物理机上的udp12003映射到虚拟机的udp2003端口)
三、实际操作
1) 配置Vagrantfile文件
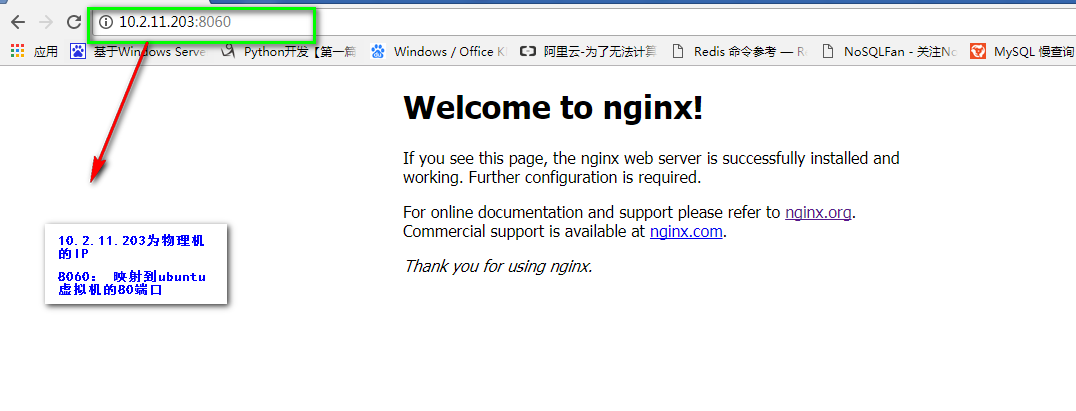
[root@vagrant ubuntu]# vim Vagrantfilevagrant box outdated. This is not recommended.config.vm.box_check_update = falseCreate a forwarded port mapping which allows access to a specific portwithin the machine from a port on the host machine. In the example below,accessing "localhost:8080" will access port 80 on the guest machine.config.vm.network :"forwarded_port", guest: 80, host: 8060,host_ip: "10.2.11.203"config.vm.network :"forwarded_port", guest: 22, host: 2100, host_ip: "10.2.11.203"
(配置2个端口映射,把物理机的8080映射到虚拟机80,物理机的2100映射到虚拟机的22)
2)启动虚拟机
[root@vagrant ubuntu]# vagrant upBringing machine 'default' up with 'virtualbox' provider...==> default: Importing base box 'ubuntu16.04_louis'...==> default: Matching MAC address for NAT networking...==> default: Setting the name of the VM: ubuntu_default_1517298331069_68029==> default: Clearing any previously set network interfaces...==> default: Preparing network interfaces based on configuration...default: Adapter 1: nat==> default: Forwarding ports...default: 80 (guest) => 8060 (host) (adapter 1)default: 22 (guest) => 2100 (host) (adapter 1)default: 22 (guest) => 2222 (host) (adapter 1)==> default: Running 'pre-boot' VM customizations...==> default: Booting VM...==> default: Waiting for machine to boot. This may take a few minutes...default: SSH address: 127.0.0.1:2222default: SSH username: vagrant ( 登录vagrant虚拟机的用户,这里不同的box用户不一样,我这里是vagrant)default: SSH auth method: private keydefault: Warning: Remote connection disconnect. Retrying...default:default: Vagrant insecure key detected. Vagrant will automatically replacedefault: this with a newly generated keypair for better security.default:default: Inserting generated public key within guest...default: Removing insecure key from the guest if it's present...default: Key inserted! Disconnecting and reconnecting using new SSH key...==> default: Machine booted and ready!==> default: Checking for guest additions in VM...default: The guest additions on this VM do not match the installed version ofdefault: VirtualBox! In most cases this is fine, but in rare cases it candefault: prevent things such as shared folders from working properly. If you seedefault: shared folder errors, please make sure the guest additions within thedefault: virtual machine match the version of VirtualBox you have installed ondefault: your host and reload your VM.default:default: Guest Additions Version: 5.0.40default: VirtualBox Version: 5.1==> default: Mounting shared folders...default: /vagrant => /vagrant/ubuntu
虚拟机启动后,我们查看,在/vagrant/ubuntu目录下,会生成一个.vagrant的目录,我们查看
[root@vagrant ubuntu]# tree -a.├── ubuntu-xenial-16.04-cloudimg-console.log├── .vagrant│ └── machines│ └── default│ └── virtualbox│ ├── action_provision│ ├── action_set_name│ ├── creator_uid│ ├── id│ ├── index_uuid│ ├── private_key---------虚拟机的私钥│ └── synced_folders└── Vagrantfile
意思就是,如果我们想从其他电脑上登录ubuntu虚拟机,就必须把这个私钥拷贝过去哦,否则不能登录
3)配置xshell远程登录到ubuntu16.04虚拟机

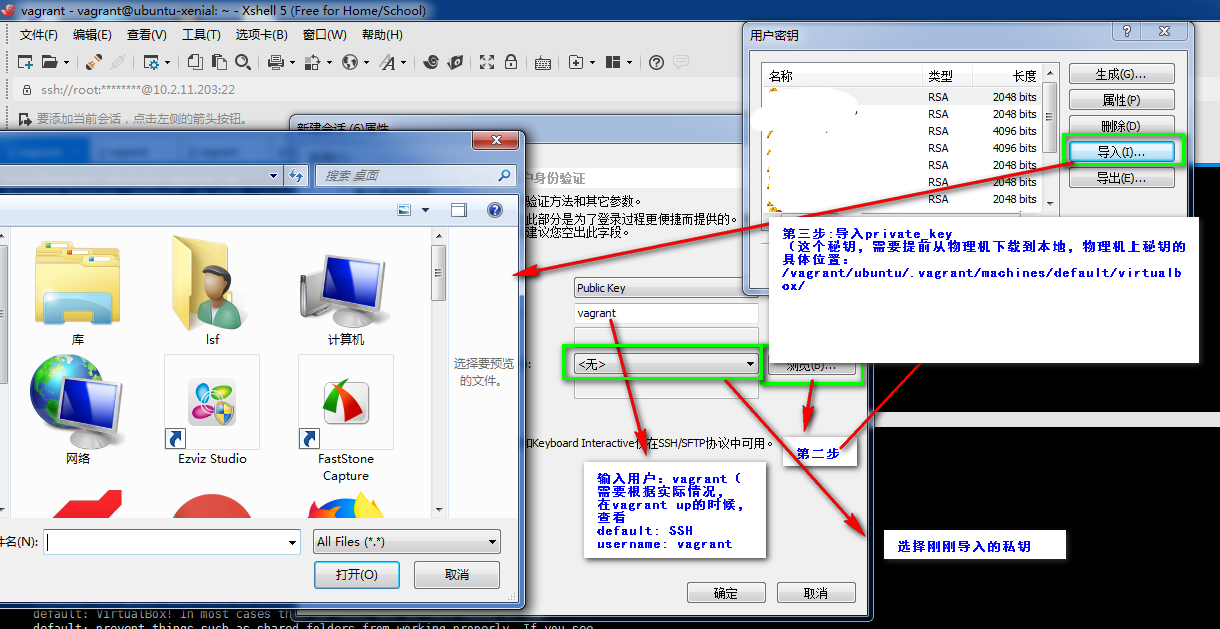
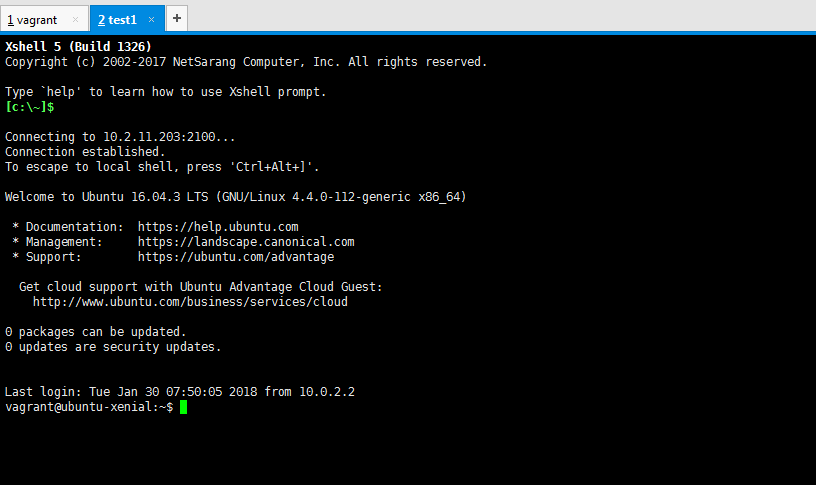
(表示我们可以从其他机器上,通过xshell连接到ubuntu16.04虚拟机)
4)如果在ubuntu16.04的虚拟机上安装nginx,然后测试访问
vagrant@ubuntu-xenial:~$ sudo apt-get -y install nginxvagrant@ubuntu-xenial:~$ ss -tunlp|grep 80tcp LISTEN 0 128 :80 :tcp LISTEN 0 128 :::80 :::